
How to Prepare Your Yard For Deck Staining
Staining a deck is a project that requires patience and proper preparation. Rushing the process and skipping steps can result in less than desirable results.
Be sure to choose a stain that penetrates wood pores rather than creating a film on top of the surface. Also, try to avoid working in direct sunlight when possible.
Sanding
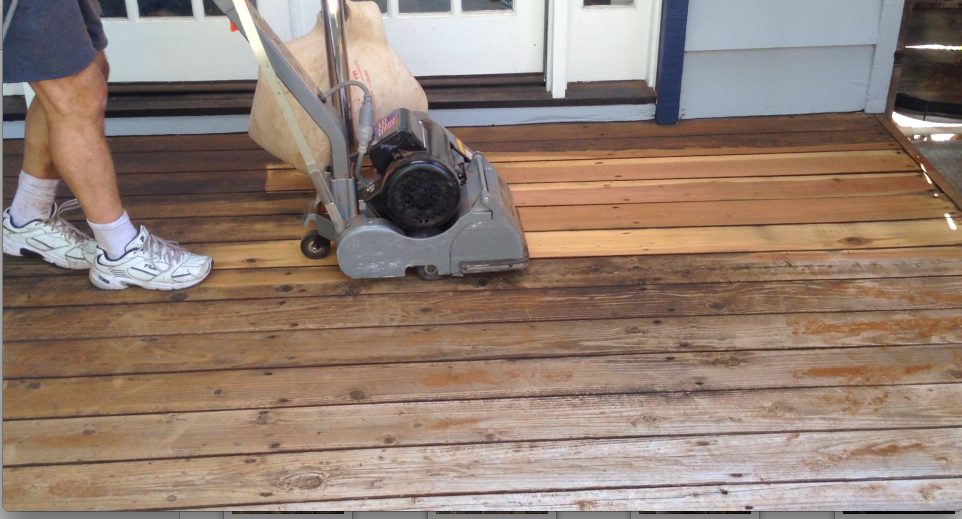
Before you can begin the Deck Staining, it is necessary to sand the surface. This removes any dirt, debris or old stain that has built up and allows the new stain to penetrate deeply into the wood grain. It is also the best way to achieve a smooth, even finish that looks great. You can use a power washer with a surface cleaner attachment or hand sand the entire deck. If you have a large deck, it may be easier to hire a professional to complete the job.
Aside from sanding, the other most important step in getting your deck ready to stain is to ensure it is dry. This will prevent the stain from flaking or bubbling, and it will make the whole process much easier for you. It is recommended that you allow the deck to fully dry for 3 days before returning furniture and allowing full use of the deck.
Staining can be done using a pressurized sprayer, a brush, or a pad applicator (which is the best option). It is recommended that you try to do as much of the work with a brush as possible as this will give the smoothest and most even appearance. It is important to find a good quality brush that has synthetic bristles that will hold their shape and not become limp as the stain dries. Many home improvement stores sell simple start kits that include all the tools you need to get started.
During the staining process, it is a good idea to wear rubber gloves and to protect your eyes by wearing protective goggles. This will keep the stain and dust from irritating your eyes and throat. Also, you may want to find a comfortable spot that will allow you to kneel or bend over for several hours at a time as you are applying the stain. It is usually best to work in the shade when staining so that you do not overheat.
It is a good idea to check the weather forecast on the day you plan to start the project. A sudden change in the weather can ruin your hard work by preventing the stain from drying properly or by leaving a wet mess behind.
Power Washing
Power washing is a good idea before staining. You'll want the wood to be clean and dry to ensure it absorbs the stain evenly. While you can use a brush and a garden hose to scrub the deck, a pressure washer gets it much cleaner and faster. Power washing also opens the pores of the wood, which helps the new stain penetrate and adhere. If you're not comfortable using a power washer, consider hiring a professional.
Once the deck is completely dry, it's time to prepare it for staining. Start by removing any furniture or accessories that might be in the way. You can store them in the shed, garage or other outdoor area. It's best to do this on a day that doesn't have any rain in the forecast. Stain doesn't soak well into damp wood, so you don't want to be in the middle of the process when it starts to rain.
Next, sweep and wash the deck with a deck cleaner to remove any dirt, grime, mildew or mold that has built up. If you can't find a deck cleaner that will remove all the debris, a power washer might be needed. If you choose to use a power washer, be careful and follow the manufacturer's instructions for the unit. The high pressure can break up fragile or deteriorated boards, so it's important to monitor the temperature of the water and work quickly.
After washing, use a wood brightener to revive the color of the deck and make it ready to accept a new coat of stain. Wood brighteners and cleaners can be purchased from most home improvement stores and some hardware centers. They're available in liquid or powder form and can be mixed with a hose or garden sprayer.
If you're going with an oil-based stain, skip the cleaning and neutralizing step. Oil-based stains breed algae and mold and contain chemicals that might leach into the soil and harm plants.
When you're ready to apply the stain, use a foam applicator pad and a long extension handle to get the job done. It's best to begin on the railings, then move to the balusters and posts. Stain one section at a time, then brush out drips and wipe off excess. Limit access to the deck for at least 24 hours to give the stain a chance to fully cure.
Cleaning & Brightening
Once you have your deck cleaned, it’s important to let it dry completely. This will typically take 1-2 days. You can use a moisture meter to determine when the wood is ready. When the deck is fully dry, you’ll be able to stain. If you’re using a high-quality exterior stain, it’s also recommended that you apply a clear sealant over the top of the stained surface. This will offer additional water and UV ray protection and will extend the life of your deck stain.
Before you start applying your stain, it’s a good idea to cover any plants or furniture that are underneath the deck with tarps. You can also run masking paper or drop cloths next to the siding where your deck rail meets your home to prevent any stain dripping or splatter from getting on it. You’ll want to remove the tarps and drop cloths once you’re finished.
After you’ve rinsed the deck, it’s a good idea to apply a deck brightener. This will lighten the color of the wood, and it will help the stain look better and last longer. You can find deck brighteners at most hardware stores.
When you’re ready to stain, make sure that you have all of your materials and tools on hand. It’s also a good idea to pick a day that doesn’t call for rain or direct sunlight. Stain doesn’t absorb well into damp wood, and direct sunlight can cause the stain to dry too quickly.
You should always follow the instructions on the stain container carefully. Some stains will suggest that you apply two coats. If so, it’s a good idea to work in the shade and to let each coat dry before applying the next one. It’s also a good idea not to stain the whole deck at once, but instead to stain a few boards or strips at a time while maintaining a wet edge.
When you’re finished, remember to clean up your rags and brushes. If you accidentally drip or splatter the stain on concrete or your house, it’s usually fairly easy to remove once it’s dried.
Preparing Your Yard
While staining a deck may seem like a fairly easy DIY project, it can actually be quite tricky. Proper staining requires careful attention to detail and the right weather conditions for best results. It’s also important to make sure that you have the right products and tools for your project, as well as enough stain to cover the area you are planning to stain. You should also keep in mind that stains do not last forever, and that you should expect to restain your deck every 3-4 years in order to maintain its appearance and durability.
The first step in preparing your yard for staining is to sweep it thoroughly to remove any dirt and debris that has accumulated over time. Using an outdoor, rough-surface rated broom is the most effective way to do this. You should also use this opportunity to inspect your deck for any signs of rot or damage. Look for any boards that appear to be loose, and if you find any that are soft when pressed with a hard object, replace them immediately. If you see any spores of mildew or mold, scrub them down with a deck cleaner to remove them.
Before you start staining your deck, check the forecast for the days that you plan on working on it. Humidity can be the biggest enemy of a successful staining job, as it slows down the drying process and can cause your stain to become sticky or fail to adhere. Choosing a dry day is especially important for wood decks, as they can retain moisture that can cause fungus and decay.
Ideally, you will want to stain your deck on a warm, clear day. Avoid direct sunlight, as this can cause your stain to flash dry, preventing it from penetrating the wood properly and shortening its lifespan. It’s also a good idea to choose a day that isn’t windy. The wind could blow leaves, twigs, and other debris onto the wet stain and leave unsightly marks.
If you aren’t able to stain on your desired date, you can try to speed up the drying process by lightly misting your deck with water. Just be sure to use a superfine mister attachment on your garden hose so that you don’t accidentally damage your deck with too much moisture.
Staining a deck is a project that requires patience and proper preparation. Rushing the process and skipping steps can result in less than desirable results. Be sure to choose a stain that penetrates wood pores rather than creating a film on top of the surface. Also, try to avoid working in direct sunlight when possible.…